• How We Do It

    How We Do It

    Lorem ipsum dolor sit amet, consectetur adipiscing elit. Mauris sit amet nisl lectus, id sagittis metus.

  • Easy to Customize

    Easy to Customize

    Nunc sapien risus, molestie sit amet pretium a, rutrum a velit. Duis non mattis velit. In tempus suscipit sem, et consectetur.

  • Clean Design

    Clean Design

    Class aptent taciti sociosqu ad litora torquent per conubia nostra, per inceptos himenaeos. Nam consequat risus et lectus aliquet egestas.

  • Works Everywhere

    Works Everywhere

    Nullam a massa ac arcu accumsan posuere. Donec vel nibh sit amet metus blandit rhoncus et vitae ipsum.

  • Web Development

    Web Development

    Suspendisse eleifend nulla in est euismod scelerisque. Etiam lacinia fermentum nunc id imperdiet.

  • Color Picker

    Color Picker

    Nullam tortor tellus, iaculis eu hendrerit ut, tincidunt et lorem. Etiam eleifend blandit orci.

Showing posts with label Hacking. Show all posts

Sunday, July 22, 2012

Hardware Equipment for Hacker Labs PART-2

1 comments

Before you start building your penetration testing lab you must consider what kind of lab need in order to have the appropriate equipment.So the hardware requirements depend of the type of the lab that you want to have.

There are five types of Labs that you can create:
1. Internal

2. Virtual

3. External

4. Project-specific

5. Ad-hoc
You might want to recreate the network of your company in your lab in order to have realistic and proper results.

If you have the budget and the space you can have a physical lab with a complete set of networking devices (routers,switches,hubs) and a hardware firewall.Otherwise you can create a virtual lab with many hosts with different operating systems which is a more economical approach and provides flexibility in case that you want to recover/rebuild your lab.

Computers


The number of the computers that you have in your availability will depend probably of the budget that you have to spend for the penetration testing lab.It is always better to have many workstations with different operating systems installed however you can do the job with 2 computers by creating a virtual lab.

CABLES


Of course you will need Ethernet cables with the RJ-45 connectors.Crossover and loopback adapters can prove handy.Also if you have include in your lab network and routers you will need and some rollover cables.Having a wide variety of different cables will allow you to have different network topologies according to your needs.

Hubs,Switches and Routers


These components are essential if you have a physical lab because you can create a proper network.It is almost impossible not to find Cisco products in every network that you will go for your penetration tests so choosing to build your lab with Cisco products it is a brilliant idea.HoweverCisco products are expensive so you probably want to find some older versions.

Removable disk storage
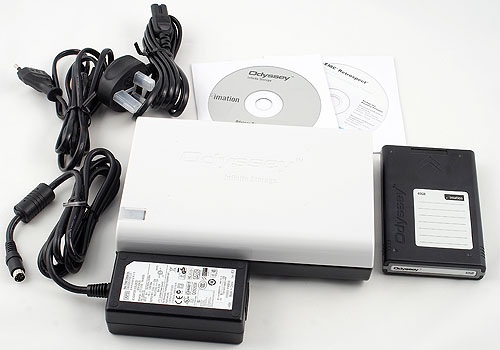

You might want to have some USB and FireWire drives that will allow you to save and restore the images ofyour systems in case that become corrupt during a test.

It is almost a necessity to have a Network-attached storage (NAS) which you can keep copies of configuration files,software,system images and tools.The NAS will act as a central storage location so that you can access it from your network hosts.

FIREWALL


In companies networks it is almost impossible not to meet a Firewall and specific firewall policies.Installing and setting up a firewall for your lab can help you to build up realistic scenarios.

Wireless Routers,WiFi Access Points and Cards


If your company has also a wireless network or you are offering and wireless penetration testing services and you need also training some wireless cracking tools then you musthave the proper equipment.WiFi cards,Access points and Wireless Router will help you to build a WiFi network for your tests.

KVM,Power Strips and Surge Suppressors


If you build a lab with many workstations then you will not want to deal with a bunch of monitors,mice and keyboards that will limit your space in the lab.A KVM switch can save a lot of space.Also you need to have power strips,surge suppressors and maybe a UPS.
As a conclusion your hardware gear must include the following:
*. Computers
*. Cables
*. Hubs
*. Switches
*. Routers
*. Removable disk storage
*. Firewalls
*. Cisco equipment
*. Network-attached storage (NAS)
*. Keyboard,Video,Mouse switches (KVM)
*. Power strips and Surge suppressors
*. Wireless Access Points
*. Networking Tools
Remember also that before buying the hardware components for your penetration testing lab you should ensure that the hardware will support what is commonly used in the corporate world.


Read more

Monday, February 6, 2012

Basic Lab Setup For Hacker Part-1

0 comments
hacking/

In this tutorial we will discus how you can setup a lab for yourself to practice hacking on your system. At very basic level a hacker is in need of 2-3 systems with a Wired LAN or Wireless LAN. But if you are the one who has started just like me with just one laptop or computer then possibly there's no way you can match this setup. So following was my solution to start practicing withonly one laptop or PC meeting above criteria of multiple computers connected in LAN. Atmost basic level following are your requirements.


Requirements:

A Computer:

First of all a computer which must have minimum following configuration.

A processor with 1.7GHz clock speed,

120GB + Hard disk

2GB RAM, Please note than yourRAM must be above 1GB for practicing. If your RAM is less than 1GB or 1GB I 'll highly recommend you buy 512MB module extra or 1GB gigs for you.

A Virtual PC Emulator:

A virtual PC emulator is needed since I assumed you don't have multiple PC's to setup your lab, even if you have it I would prefer to advice you to use a Virtual PC Emulator. There are several options to pick from butour pick is “Oracle's Virtual Box”. Reason its open source means free, low on resources, supports all kind of network types, no problem to setup screen options, it automatically setups resolution once you install guest installation and have nearly all that features that a professional virtual PC emulator may have. Following is download link to virtual box latest version.

http://www.virtualbox.org/wiki/Downloads

A professional choice is VM-Ware. You can purchase it from following link if you wantto run it on Mac.VMware Fusion 3Though VM-Ware have several advantages over Virtual Box, virtual box is just good to go. Prefer it if you want to shed money.

An Online Synchronization Service:

If you think even that needs shedding money, then I want to assure there's again a free alternative available, its name is Drop Box. Go to www.dropbox.com and create your personal free account thendownload its setup file and install for synchronization.

A Static IP Address:

Now that will be problem to get a static IP address since a static IP Address may cost you nearly $100 I.e approximately Rs.5000. But don't worry about it we have a free alternative solution to counter problem of static IP. So when there'll be need I 'll clear how to tackle it else even if you have money to shed I will not recommend it.

A PC restore utility:

There are no free alternative toPC Restore Utilities so we will work out on evaluation version. Download Farconics Deep Freeze from following link

http://www.faronics.com/en/DownloadEvaluationEditions.aspx

IP Address Hiding Utility:

Proxy Servers, Anonymizors and VPS are some IP address hiding options. We will discuss them when their need will come in to play.

Connection:

Of course when you want to learn hacking you need a high speed Internet connection. Opt for a USB dongle by BSNL, TATA,Reliance as mobile broadband and BSNL land-line broadband is just much better option. If you don't have high speed connection and you work on slower connection like GPRS and dial-ups its hard to learn hacks done over Internet.


Procedure:

Before you proceed create a separate partition for installation of Virtual system, the partition must be at least 15GB in size. First of all download latest version of Oracle's Virtual Box and install it on your system. While installation it'll ask several times about installing various components just press OK for allof them because you'll need them all.

*check below link tutorial on how to setup and install OS in Virtual System.

Once installation is done virtualbox will come up with several pop ups when you'll be using it,please read each pop up because they are your tutorials to master “Virtual System Environment”. Please please please, don't skip any of those pop ups. When your installationwill be over you'll see virtual system isn't really working in full screen. To tackle it run virtually installed system click on devices and “Install Guest Additions”. From next time it will run in full screen.

Setting up virtual system is done, now jump up to the next part start your virtual system open web browser of virtual system and download Drop-Boxapplication and sign in to it. Now onwards whenever you'll download any software for hacking paste it into Drop Box default folder, it'll synchronize it with your online storage. After installing and signing up Drop Box download Deep Freeze don't install it now. Shutdown your Virtual System and copy virtual hard disk as backup in another folder, start system and install Deep Freeze, before installing it read its online manual so that you should not get problem using it. Now when your Deep Freeze evaluation time expires just delete older hard disk and copy the backup and start over again. This will keep your evaluation copy last forever. If you haven't yet understood what we actually did with virtual box then I should clear we just setup a Virtual LAN for our practice using just a single computer. So you can't now boast you don't have a LAN to practice or a remote host to practice. You can run two virtual systems simultaneously if you have at least 2GB RAM. This not only solves our problem of private LAN to practice but it indirectly also offers you remote host to attack on. Our personal say is don't install virtual system on Windows XP or Vista, get Windows 7 or Server 2008.

Lab setup tutorial is over now go and setup your systm to get started. Please ask if you have got any problems related to setup, if everything is fine please don't forget to convey me. Thanks for reading keep visiting.


*tut on Linux - Install on Windows 7 Virtual Machine using VirtualBox


Read more

Saturday, February 4, 2012

How To Create Ghost Image Of Disk For Free

0 comments
ghost image linux


Ghost images are cloned hard disks that can be used for backup purposes and backing up data. Are you among the people who always get bothered by following questions.

How to create disk image without software or free?

How to create ghost image of hard disk for free?

or

How to clone a disk for free?

If yes then you are the person who want to backup complete disk along with OS. So lets see how we can create hard disk image or ghost image or disk clone without using those highly priced ghost creating software.

Requirements:

Ubuntu Live CD/DVD(get from here)
, A hard disk with more capacity than the one you want to clone and some basic knowledge of Linux.
Procedure:
Linux provides disk dumping feature, this feature can be used for creating complete backup of any possible storage media. And we will use this feature of Linux command shellto create ghost images. While writing this tutorial I am assuming that you want to backup a hard disk which already have an OS installed in it.

Boot from Ubuntu Live CD/DVD

Now mount the hard disk you want to take backup on /mnt folder

Now take backup using following commands,
[root@localhost~]dd if=/dev/sda1 of=/mnt/image.img

this will create complete image of hard disk partition sda1, next you must take backup of partition table,

[ root@localhost ~]#dd if=/dev/sda of=/mnt/partitiontable.img count=0 bs=512

or

[ root@localhost ~]#dd if=/dev/sda of=/mnt/partitiontable.img count=0 bs=1024

Now while restoring first restore partition table on new hard disk

[ root@localhost ~]#dd if=/mnt/partitiontable.img of=/dev/sda count=0 bs=512

or

[ root@localhost ~]#dd if=/mnt/partitiontable.img of=/dev/sda count=0 bs=1024

Finally restore ghost image,

[ root@localhost ~]#partprobe /dev/sda

[ root@localhost ~]#dd if=/mnt/image.img of=/dev/sda1
Now please note that when you'll create ghost image no matter what amount of data you have in disk your ghost disk will be of actual size of source hard disk, that means if your source hard disk is 40GB insize then your ghost hard disk will also be of 40GB. If you think above tutorial was little geeky then even I don't take different view from you, yes itsreally little geeky but believe me its not that difficult.

If you loved reading this post please subscribe to our email list. Thanks for reading keep visiting.


Read more

Two Tips To Speed Up Your Bandwidth By 30%

0 comments
increse internet speed

Tip Number-1

By default all Windows systems reserves 20% of your bandwidth speed. This is done so that any specific application should not overpower other applications for bandwidth. Though this setting is done for good purpose it limits connection speed even though only one application is using bandwidth. By the way even though this setting is disabled no application will conflict with each other on bandwidth. So turning it off can giveyou boost of 20% in your bandwidthspeed.

To turn this feature off,

Click Start-->Run-->type gpedit.msc

This opens the group policy editor. Then go to:

Local Computer Policy-->Computer Configuration-->Administrative Templates-->Network-->QOS Packet Scheduler-->Limit Reservable Bandwidth

Double click on Limit Reservable bandwidth. It will say it is not configured, but the truth is under the 'Explain' tab :

"By default, the Packet Scheduler limits the system to 20 percent of the bandwidth of a connection, but you can use this setting to over ride the default."

So the trick is to ENABLE reservable bandwidth, then set it to ZERO.

This will allow the system to reserve nothing, rather than the default 20%.

increse internet speed

Once done your bandwidth will show increase by 20%.

Tip Number-2

In acient times connection speed was very slow and data has not only to suffer loss due to transmission speed but also due to the hardware flow error. Though with time connection speed has reached much better place than before you hardly need any hardware flow control which by default is still available in all Windows system. To disable it,

Click Start button-->select Connect To

Now right click on your modem and select Properties now select configure and disable all “ Hardware Features ”

Now disconnect and connect to your network. You’ll find 10% increase.
increse internet speed

Before you apply these tweaks open http://www.speedtest.net/ from your browser and check your connection speed. Then apply both tweaks and recheck your speed.

Tested on Windows XP, Windows 2000, Windows 2003 and Windows Vista.

OLD TRICK BUT NICE ONESmiley


Read more

Friday, February 3, 2012

How to hack/crack Wifi (WEP) password in simple steps.

0 comments
hackwifi


hackwifi
Hello friends. Many of you must be aware of the technique I will discuss here as it is not new and you will find hundreds of results on google about it. Even there are lots of cool youtube videos floating around on how to crack the WEP keys of a wifi network. Wardriving is fun but dont make it illegal. There was a critical aspect missing in almost every tutorial I read.


All the tutorials and videos on WEP cracking feature BackTrack as some magical tool which on executing some commands give you the WEP password. But its not the truth. Many wannabe hackers simply follow the video without even giving a thought to what they are doing. There is just a simple point that people forget is the use of wireless cards. When you are trying to break a WEP key then you will need a special wireless card which can inject packets into the router of the target wifi. The normal wireless cards available in our laptops are not capable of doing it. So the hardware is a critical pont. One of the most commonly used packet injection capable wireless card is Alfa AWUS036H card from Alfa Networks as BackTrack supportsthis easily. This is available on Amazon.comfor a retail price of$34( hope you might have got the answer why you failed when you followed all steps properly). Rest all is same as the normal steps you follow. for those who are new to WEP cracking, here is the complete tutorial.

Before you start , There are

There are 2 primary requirements : Compatible Wireless card(I discussed above) and Backtrack live CD (download from here)Lets proceed with the steps.

To crack WEP, you'll need to launch Konsole, BackTrack's built-in command line.

First run the following to get a list ofyour network interfaces:
airmon-ng The only one I've got there is labeledra0. Yours may be different; take note of the label and write it down. From here on in, substitute it in everywhere a command includes (interface).

Now, run the following four commands. See the output that I gotfor them in the screenshot below. airmon-ng stop (interface)

ifconfig (interface) down

macchanger --mac 00:11:22:33:44:55 (interface)

airmon-ng start (interface)


hackwifi
Now it's time to pick your network. Run: airodump-ng (interface) To see a list of wireless networks around you. When you see the one you want, hit Ctrl+C to stop the list. Highlight the row pertaining to the network of interest, and take note of two things: its BSSID and its channel (in the column labeled CH), as pictured below. Obviously the network you want to crack should have WEP encryption (in the ENC) column, not WPA or anything else.

hackwifi
Like I said, hit Ctrl+C to stop this listing. (I had to do this once or twice to find the network I was looking for.) Once you've got it, highlight the BSSID and copy it to your clipboard for reuse in the upcoming commands.

Now we're going to watch what's going on with that network you chose and capture that information to a file. Run: airodump-ng -c (channel) -w (file name) --bssid (bssid) (interface)Where (channel) is your network's channel, and (bssid) is the BSSID you just copied to clipboard. You can use the Shift+Insert key combination to paste it into the command. Enter anything descriptive for (file name). I chose "yoyo," which is the network's name I'm cracking.

hackwifi
You'll get output like what's in the window in the background pictured below. Leave that one be. Open a new Konsole window in the foreground, and enter this command:aireplay-ng -1 0 -a (bssid) -h 00:11:22:33:44:55 -e (essid) (interface)Here the ESSID is the access point's SSID name, which in my case is yoyo.What you want to get after this command is the reassuring"Association successful" message with that smiley face.

hackwifi
You're almost there. Now it's time for:aireplay-ng -3 -b (bssid) -h 00:11:22:33:44:55 (interface)Here we're creating router traffic to capture more throughput faster to speed up our crack. After a few minutes, that front window will start going crazy with read/write packets. (Also, I was unable to surf the web with the yoyo network on a separate computer while this was going on.) Here's the part where youmight have to grab yourself a cup of coffee or take a walk. Basically you want to wait until enough data has been collected to run your crack. Watch the number in the "#Data" column—you want it to go above 10,000. (Pictured below it's only at 854.)

Depending on the power of your network , this process could take some time. Wait until that #Data goes over 10k, though—because thecrack won't work if it doesn't. In fact, you may need more than 10k, though that seems to be a working threshold for many.

hackwifi
Once you've collected enough data, it's the moment of truth. Launch a third Konsole window and run the following to crack that data you've collected:aircrack-ng -b (bssid) (file name-01.cap)Here the filename should be whatever you entered above for (filename). You can browse to your Home directory to see it; it's the one with .cap as the extension.
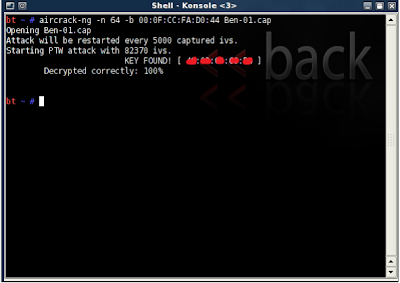
If you didn't get enough data, aircrack will fail and tell you to try again with more. If it succeeds, it will look like this:

hackwifi
The WEP key appears next to "KEY FOUND." Drop the colons and enter it to log onto the network.The process may seem to be straight forward but it requires lot of patience and practice. But its not at all difficult. You will enjoy testing it.


For any further questions or doubts, raise your concern via comments below!


Read more

Thursday, February 2, 2012

Surf Anonymously with Platinum Hide IP 3.1.5.6

0 comments
ip

Everyday we read more and more stories about hackers breaking into big businesses, stealing their identities and wreaking general havoc. It's no wonder that we have become wary of the Internet and concerned about the Internet privacy. Use Platinum Hide IP to keep your real IP address hidden, surf anonymously, secure all the protocols on your PC, provide full encryption of your activity while working in Internet, and much more.

Get Platinum Online Privacy Protection. With Platinum Hide IP, you can surf anonymously, send anonymous emails through any webbased mail system, access blocked websites or forums, get protected from any website that wants to monitor your reading interests and spy upon you through your unique IP address, etc. Your identity is secure, protected, and anonymized.


Read more
